
How to pack TVs, computers, and consoles for a move
TVs, gaming consoles, computers, audio gear — the modern living room is a $5,000 stack of glass and cables. The good news: you probably already have the right boxes (the originals). The trick is documentation: photograph every connection before you unplug, label every cable, and let the truck thaw before you plug anything in.
 Watch the video
Get your supplies first
If you saved the original boxes, dig them out before you start. Nothing protects electronics like the carton they shipped in.
The electronics walkthrough
Our packers walk through the full sequence: photographing connections, bagging and labeling cables, choosing the right carton, wrapping screens in anti-static, and the marking that keeps your TV upright on the truck.
Five steps, in order
Document before you disconnect. Bag every cable. Use the original carton if you have it. Wrap screens in anti-static. Mark every box.
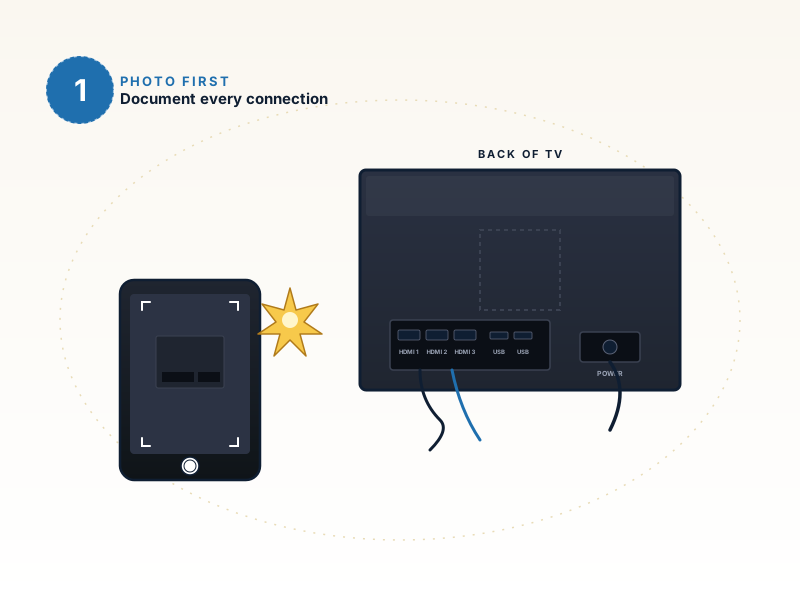
Photograph every connection before you touch a cable
Before you touch a single cable, take photos of every connection on the back of every device. Wide shot first, then a close-up of each port. You’ll thank yourself when reassembling — especially with AV receivers, gaming setups, and anything with more than two HDMI inputs.
- Wide shot of each device’s rear panel
- Close-up of each port and its cable
- Snap the front too — settings menus help on reset
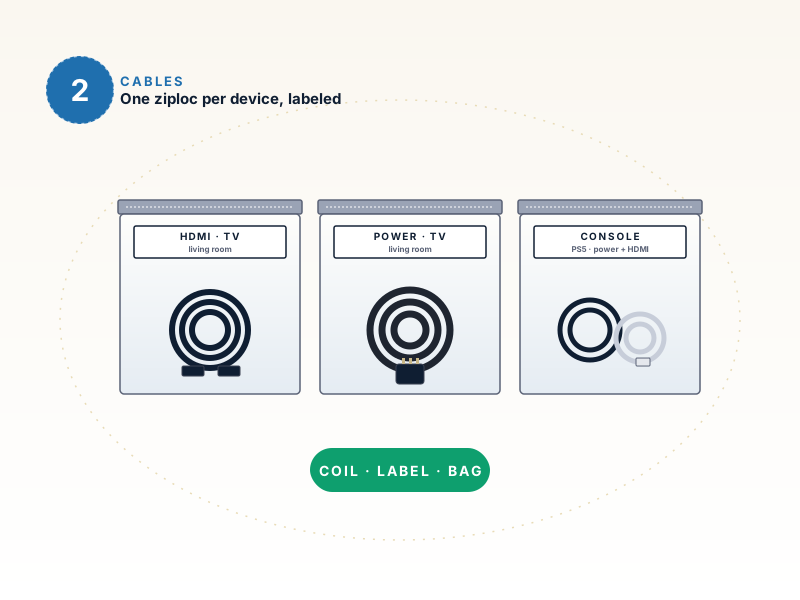
Bag and label cables by device
Each device’s cables go in their own labeled ziploc — “TV · HDMI/POWER,” “PS5 · POWER/HDMI,” etc. Coil cables loosely; don’t fold them tight. A tight crimp on an HDMI cable can damage the internal conductors.
- One bag per device, named on the bag
- Coil cables in loose loops, not tight folds
- Toss remotes and accessories in the same bag

Original packaging beats anything you can DIY
If you saved the original box, use it. The custom foam inserts protect better than anything you can DIY — the manufacturer engineered them for this exact unit. No original box? Use a sturdy carton with three inches of bubble wrap on every side.
- Original carton + foam inserts whenever possible
- Otherwise: 3″ of bubble wrap on every side
- Double-walled box for screens over 32″
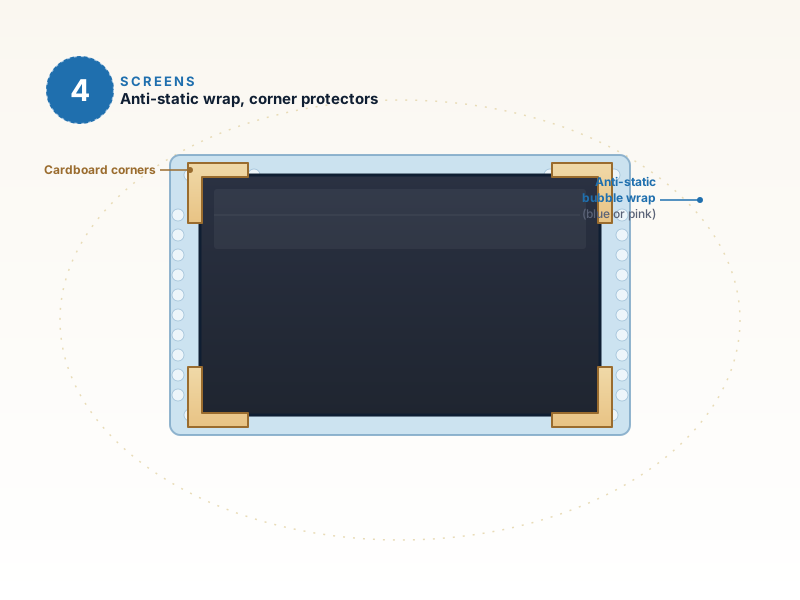
Wrap screens in anti-static, corners first
TVs and monitors get wrapped face-down in anti-static bubble wrap (the light blue or pink kind — not the clear). Cardboard corners on all four corners of the screen before the wrap goes on. Tape doesn’t touch the screen surface, ever.
- Anti-static wrap only — clear bubble can carry charge
- Cardboard corner protectors on all four corners
- Tape on the wrap, never on the screen

Mark every box: FRAGILE, THIS SIDE UP, contents
Every electronics box gets “FRAGILE” in red on every side, “THIS SIDE UP” arrows, and a list of contents. Mark the box that holds the originals so you don’t lose track of remotes and accessories — that’s the box that always disappears.

Let it thaw
Electronics in a cold truck develop internal condensation. Plug a frozen TV into power and the moisture inside ruins the board. Wait 24 hours after delivery before powering anything on. Same rule applies after a hot summer ride — let everything reach room temperature first.
The mistakes we see most often
Three habits that turn an electronics pack into a warranty claim or a Saturday on the manufacturer support line.
Skipping the photos
Without photos, you’ll spend a Saturday on the manufacturer support line trying to remember which HDMI fed the soundbar.
Generic clear bubble wrap on screens
Standard bubble wrap can carry static. Static damages sensitive electronics and pixel arrays. Anti-static (blue or pink) only.
Plugging in immediately on delivery
Condensation kills the board. Wait the full 24 hours, no matter how excited the kids are about the gaming console.
Want us to handle the packing?
Our crews pack thousands of electronics setups a year. No fried boards, no scratched screens — guaranteed.